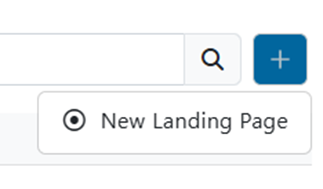
Go to your TIDWIT node and navigate to the Landing Pages section.
Click on the [+] button, then click on New Landing Page to create a new or edit an existing one.
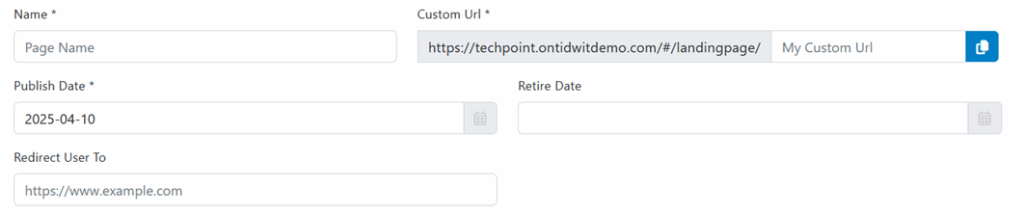
This is the default tab where you can define the landing page’s core settings.
Fields to Complete:
- Nombre (Required):
Enter a descriptive name for your landing page. - Custom URL (Required):
Customize the URL path for your landing page.
Example:
https://techpoint.ontidwitdemo.com/#/landingpage/ + YourCustomName - Publish Date (Required):
Select the date the landing page will become publicly available. - Retire Date (Optional):
Set an expiration date for the page if you want it to be deactivated automatically after a certain period. - Redirect User To (Optional):
Enter a URL to which users will be redirected when the landing page is retired.
Landing Page Access
Select the appropriate access level for your page:
- Abrir
Anyone with the link can access the page. No login is required. - Restricted
Only users who log in can view the page.

Save Your Settings
After filling out the required fields and configuring access:
- Click the Guardar button (bottom left) to apply changes and create the landing page.
Next Steps
After saving, proceed to the HTML Builder tab at the top to design and customize the content layout of your landing page.
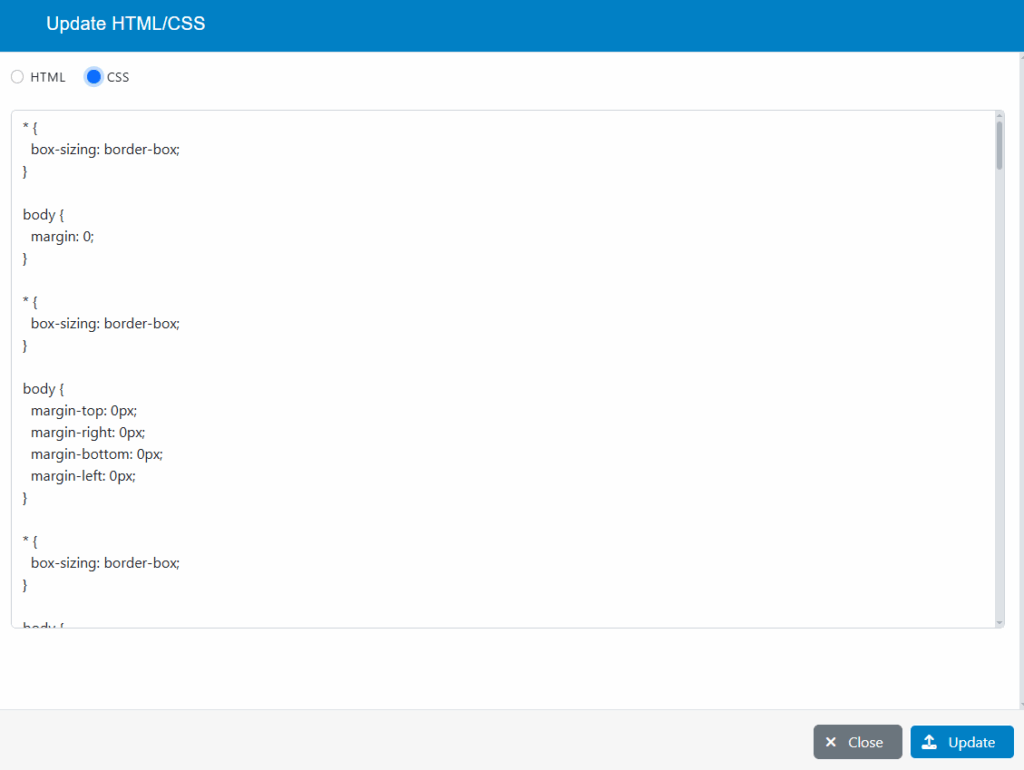
At the bottom of the page, click the “Update HTML/CSS” button:

A new modal will be displayed, there you can use your own HTML & CSS code, paste it in the text area and click the “Update” button.

That’s it! Your page has been successfully replicated in TIDWIT.
The HTML Builder allows you to visually construct your landing page using drag-and-drop content blocks. The blocks are divided into several categories:
Basic Elements
Link Block: Inserts a clickable block styled as a button or image.
Quote: Displays a stylized quotation.
2 Columns 3/7: Adds two columns with 30%/70% width ratio.
Text: Simple text block for custom content.
Text Section: Stylized text section for emphasis.
1 Column: Single full-width content area.
Link: Simple hyperlink text.
Image: Upload or link to an image.
2 Columns: Side-by-side equal columns.
3 Columns: Triple column layout for structured content.
Video: Embed a video player (e.g., from YouTube).
Extras
Required Fields Form: Form with mandatory fields.
Form Container: Group form fields.
Submit Button: Button to submit form values.
Customizable Button: Button with editable style and action.
Go to Form: The Navigation link that jumps to a section of the form.
Terms & Conditions: Checkbox or statement to accept terms.
Login Text: Displays login-related instructions or information.
First Name / Last Name / Email / Password: Individual input fields for user data collection and node registration.
Variable Tags
User Full Name: Auto-fills the user’s full name.
User First Name: Auto-fills the user’s first name.
User Last Name: Auto-fills the user’s last name.
Date: Displays the current date dynamically.
Domain Name: Inserts the domain name of the organization or instance.
Landing Page Metrics
Once the landing page has been published, the system automatically begins collecting performance metrics. These metrics are visible from the page listing view and provide a quick overview of how the page is performing with visitors and registered users.
The available metrics include:
Page views:
Displays the total number of times the landing page has been viewed. This count includes repeat visits by the same user.
Registered Users:
If the landing page includes a user registration feature, this metric shows the total number of users who have registered through that specific page.
These insights help you assess the reach and effectiveness of your landing page and guide any future updates or improvements.