Botón para Agregar Nuevo Grupo de Usuarios
From the User Groups main page, click on the + Add Group button on the upper right corner.

Pestaña de Información Básica
Aparecerá una nueva ventana:

Ingrese el nombre del Grupo de Usuarios y, en la sección de Comentarios, escriba una descripción del Grupo de Usuarios (opcional).
Haz clic en Guardar.
Pestaña de Miembros
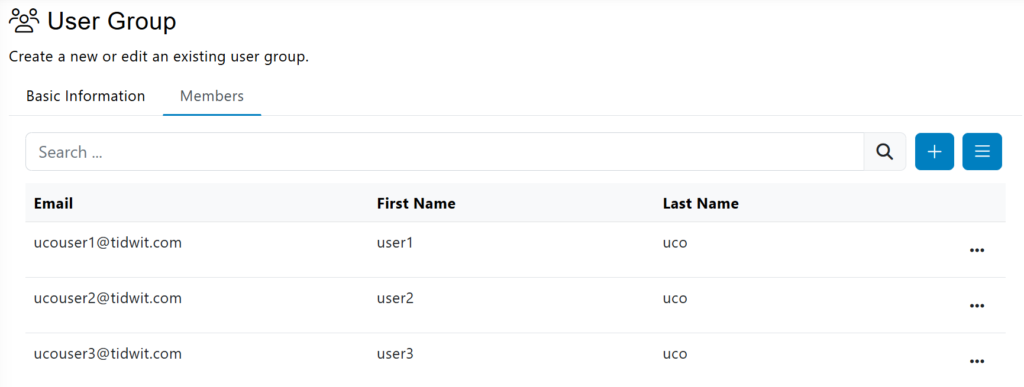
Once you click on Save in Step 2, the Members tab will appear next to the Basic Information Tab. Click on it to add users/members to the User Group.

Haga clic en el botón + Agregar Usuario y aparecerá una ventana emergente con una lista de usuarios disponibles que se pueden agregar y alguna información sobre ellos.
Click on the + Add button on the right side of each user name and it will be immediately added. You can select multiple users at a time and click on the Add All Selected button.

You can also search for specific users using the search bar and the filter at the top.

Seleccione un rango de fechas de creación y un país, y haga clic en "Aplicar".
When you are finished adding users, close that window. You will now see the added users in the list.

You can also click on the hamburger button to see another option to Import users and to Export users.

Haga clic en Exportar y se descargará de inmediato un nuevo archivo de Excel con los correos electrónicos de los usuarios, sus nombres y apellidos en la lista.
Click on Import and a new pop-up window will appear where you will be able to upload an Excel file with the user information that will be added. Uploading this excel file will automatically add the users to the list. Alternatively, you can add user emails one by one in the textbox below.

Click on Browse… if you already have an existing file with the user list. If you would like to use our template, click on Download Import Template. Next, open the Import Template in Excel and fill-in the list of users with their emails.

Save the completed template and close it. Return to the pop-up window and click on Browse…, select your file and click on Upload.

A green bar will appear indicating that the upload was successful.

Close the pop-up window and the new users will appear on the list.

Haga clic en el botón de "tres puntos" a la derecha de cualquier usuario para eliminarlos de la lista.
Import User Group
Browse and select the Excel spreadsheet containing the user groups to upload. Only users who have an existing account on TIDWIT will be mapped to the corresponding group(s). Other users will be rejected and need to be created under Manage Users firstGroup Import Options.
If the User Group already exists:
- Append the group with the new users listed in the import file (only new users will be added, existing users will be ignored)
- Replace the group with the new list of users from the import file
