To go to the Users section from the User Groups page click on the Users icon on the upper right corner:

Or from the left-hand side panel place the mouse pointer over the Users icon.

Click on the Manage Users tab and you will be directed to the Users window.

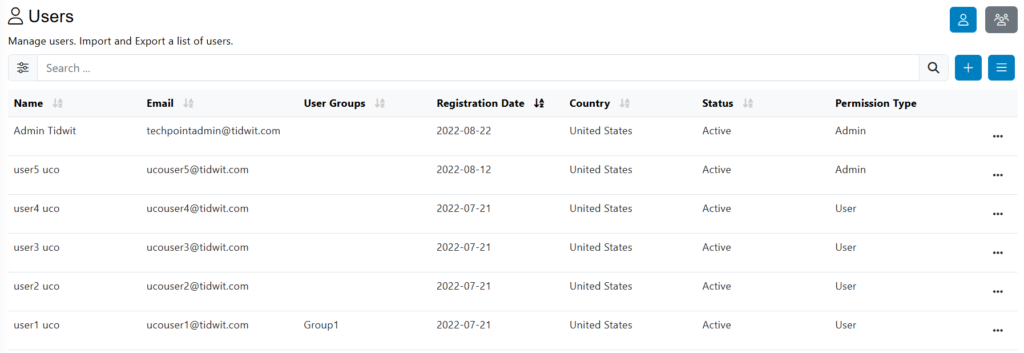
On the Users page, you will see a search bar with filters. Use them to search for existing specific users in the User List below.

You can filter users by Creation Date range, Permission Type and Country. Click on Apply.
In the User List, you will see all the created users on your node. The list includes user Full Name, Email, SSO ID, Registration Date, Country, Status and Permission Type.
You can organize any column from the table by clicking the A/Z arrow next to the column label (Full Name, Email, Status).
Click on the “three dots” button to the right of any user to show more user options.
• Click on Edit to open the user editor and change its information.
• Click on Disable to deactivate the user on the platform. A confirmation message will pop-up, click on OK to confirm.
• Click on Change Password to change the user’s password.
• Click on Change Permissions to change the user’s permissions. When changing user permissions, a platform notification is automatically sent to the user to inform them about their new permissions.
• Click on Add to User Groups to add the selected user to a specific group.

On the upper right corner of the window click on the More… button to Import, Export and View Disabled users.

Export Users File
Click on Export and a new Excel file will be downloaded with the users’ names, emails, Single Sign On (SSO) IDs, statuses, permissions, etc.

Import Users File
Click on Import and a new pop-up window will appear where you will be able to upload an Excel file with the users’ information that will be added.

Click on Browse… and upload the file if you already have an existing file. Otherwise, click on the Download Import Template, open the Import Template in Excel and fill-in the list of users with the information required. (Note: if you leave the “Password” field empty the system will randomly generate one for the user. In the “Comments” field will appear any validation errors after the import is completed).

Save the template once you are finished and return to the pop-up window and click on Browse…, select your file and click on Upload.

A green bar will appear indicating the upload was successful.

Close the pop-up window and the new users will appear on the list.

View Disabled Users
Click on View Disabled and you will be directed to the Disabled Users Section. You will see a similar page as on the Users main page but the statuses of all users will be Disabled.

Click on the “three dots” button of any user to activate them again.
Click on Activate, and a confirmation message will pop-up. Click on OK and the user will become active on TIDWIT and be moved to the Active Users page.

To go back to the Main Users page, click on the More… button and then click on View Active.
